
If you don’t know how to take a screen on your Windows 10, 11, 8/8.1, or 7 PC, we will help you to learn that. There are countless times when you will have to capture a screenshot. It could be due to your professional work or personal use.
Windows has had the ability to capture or print screen since its first-ever version in the 1980s. However, it was a bit different and the method was also peculiar. As of now, there are multiple methods that you can use to print screens on Windows.
The methods to take a screenshot or print screen have remained the same from Windows 7 to Windows 11. The latest version has a couple of more techniques as compared to the former ones. You can use any of the methods according to your ease and Windows version.
Check out all the easy and simple methods to capture a screenshot on Windows.
1. Use the PrtScn Key with OneDrive or Paint/MS Word
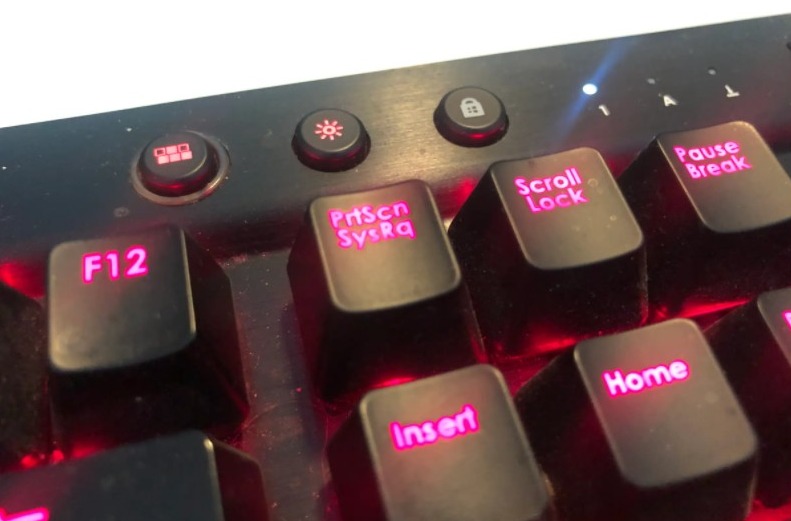
There is a key on your Windows keyboard known as “PrtScn (Print Screen).” You can press it to take a screenshot instantly. The screen capture is saved to the clipboard and you’ll have to save it manually. To do that, open Paint or MS Word, paste the screenshot there and save it.
In 2015, Microsoft has allowed users to automatically save screenshots using PrtScn with OneDrive. You just have to go to OneDrive’s settings and turn on the “Automatically Save Screenshots” feature. You can also capture to OneDrive from the Backup tab.
This will save you from having to use Paint or MS Word after pressing the PrtScn key. One more thing, you want to capture only the active screen, then you will have to use the “Alt+PrtScn” key combination.
2. Use the Windows Keyboard Shortcuts to take a Screenshot
There are multiple keyboard shortcuts available on Windows to take a screen. They are the quickest way to capture screen. The best ones are available below. You can put them in your habit:
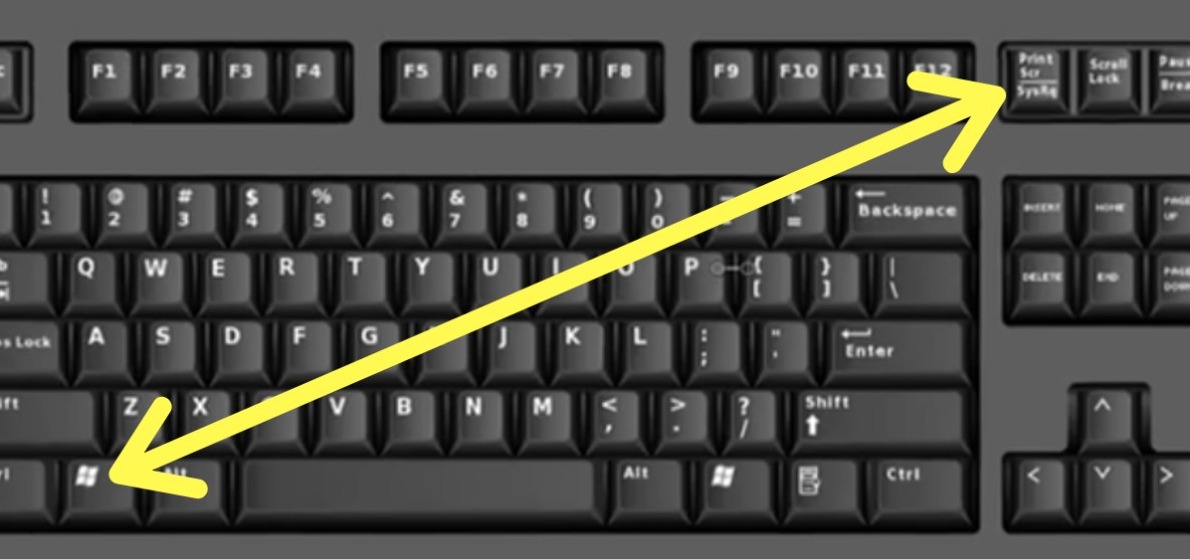
- Press the Windows Key+PrtScn Key: When you press this key combination, Windows will save the entire screen as an image file. It will be available in the “Screenshots” folder present within the “Pictures” folder.

- Press the Windows Key+Shift+S Key: When you press this key combination, the screen will dim and the mouse pointer will turn into a crossbar. You can drag it to choose the portion of the screen you want to capture. After that, you can paste the copied screenshot from the clipboard to any other program like Paint or Word.
These are the two best keyboard shortcuts to take a screenshot on Windows. Except for these, you can also press the PrtScn key or Alt+PrtScn key as mentioned in the previous method.
3. Use the Windows Snipping Tool
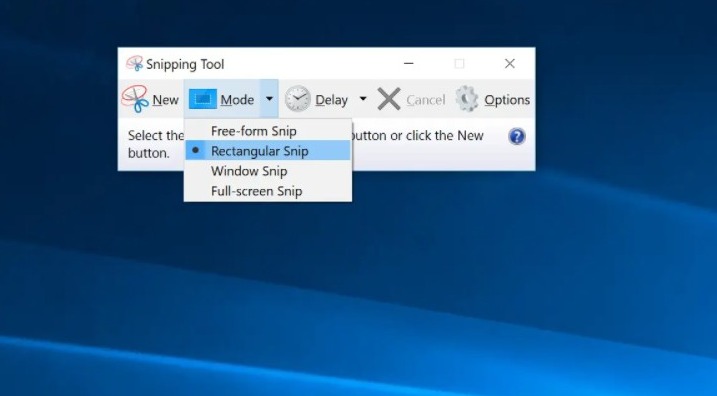
Microsoft also has a built-in tool known as Snipping Tool on Windows. You can use it to easily capture a screen. You can find the tool from the Start menu and launch it from there. After that, choose the mode in which you want to take a screenshot.
The four available modes are:
- Free-form Snip– You can draw a free-form shape around an object.
- Rectangular Snip– You can drag the cursor around an object to form a rectangle.
- Window Snip- You can choose a window, such as a dialog box, that you want to capture.
- Full-screen Snip– This will capture the entire screen.
After selecting the mode, click on “New,” and the screen will freeze. You have to use the mouse to create the screenshot, and it will then appear in the Snipping Tool window. Next, click on “File” and then click on “Save as” to save the screenshot.
You can also annotate the screenshot using the drawing tools in the Snipping Tool, or include something like a tooltip from the delay menu.
4. Use the Windows Game Bar to take a Screenshot
The Windows Game Bar is the latest utility to capture a screenshot on the OS. You can use it while playing games to take a screenshot. You have to press the Windows Key+G to trigger it.
It will include a “Camera” icon in the ‘Capture‘ section that you can click upon to take a screenshot. You can also use the “Windows Key+Alt+PrtScn” keyboard shortcut to do that.
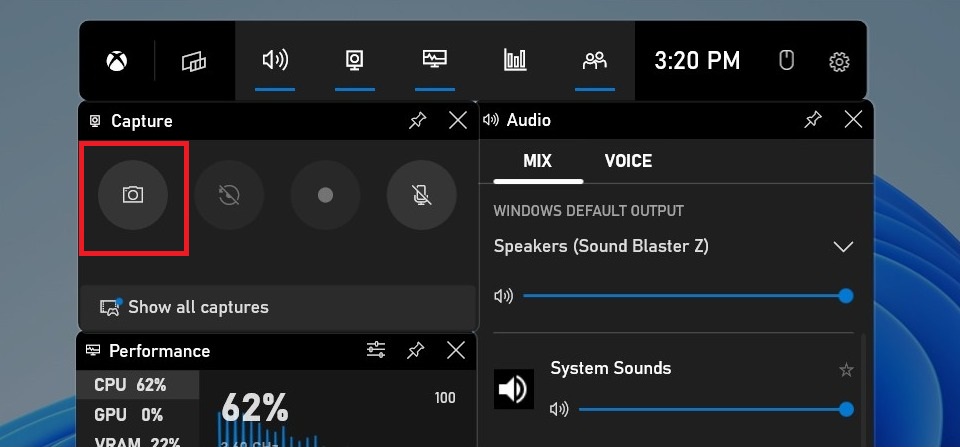
Windows will save the screenshots from the Game Bar to the “Videos/Captures” folder present within the main user folder.
5. Use Snagit to take a screenshot on Windows
Snagit by TechSmith is the perfect app on Windows to take a screenshot. It is a third-party app that users find better than the built-in screenshot app on Windows. When you click a screenshot with Snagit, it will remain in its repository. You can find it any time you need it later.
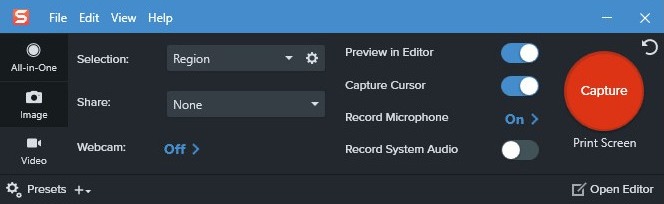
It is one of the easiest ways to capture a screenshot on Windows. You can continually capture them and then save them all together at the end. There are a number of other functionalities like video and scrolling window screenshots, image editing, and drawing tools, and border or text overlays.
The only limitation to Snagit is that it isn’t free. You’ll have to purchase a one-time license worth $49.95. However, the price is worth it if you regularly have the need to take screenshots.
These are all the best methods to capture screenshots on Windows. Now you know how to take a screenshot on your Windows PC. Don’t forget to tell us which one is your go-to method among these.