
Microsoft Word documents may be made to seem more formal and professional by using your signature. It is also very convenient to sign a number of pages at once rather than signing them one by one. When you print your papers, you may include signature lines so that the documents can be signed after they have been printed.
It’s the best method to make a Microsoft Word document professional, particularly when it comes to letters or contracts. To sign a Word document, you may do it in a number of ways. A post-print signature line, a digital signature, or a photo of your own handwritten signature may all be added to the document.
In this article, we’ll discuss the procedure to insert a signature into Microsoft word on a PC.
How to Add Signature in Word on Windows Computer?
When it comes to adding signatures to Word documents, you may do it on both Microsoft and Mac computers, but the method differs somewhat. The procedure can be applied in Microsoft 365 for Mac and Windows, and Microsoft 19, 16 and 13 for both Mac and Windows.
There are two options when you add a signature on the word. you can either add the e-signature or add a signature line. Both of them will be discussed in detail here.
How to Add Handwritten signature on Windows?
When it comes to signing papers, most individuals prefer to use electronic signatures (rather than digital signatures). The good news is that Microsoft Word makes this simple to do. A few mouse clicks are all that are required after you have your account set up. Add an electronic signature to your Microsoft Word documents by following these instructions:
- Sign your name in the centre of a white sheet of paper, by hand.

- Open the image on your PC’s File Explorer.
- At the top of your Image Explorer toolbar, you’ll see a cropping tool. USe that to crop the signature image.

- Use one of these file formats:.bmp,.jpg,.gif, etc to save the signature on your computer.
- Click Save a copy after you’ve finished cropping the picture to your desire.
- Now, go to the word document in which you want to add the sign.
- Tap on the “Insert” tab and select “Pictures” from the list of options.

- Insert the saved sign using any of the given methods. Resize the picture by clicking on any of the four dots in the image’s corners.


How to Add Signature Line on Windows?
You may also include a signature line in your documents using Microsoft Word. This shows the recipient where they need to sign. Follow the below steps to add a signature line to your word document.
- Left-click on the place in the word document where you want to add a signature line.
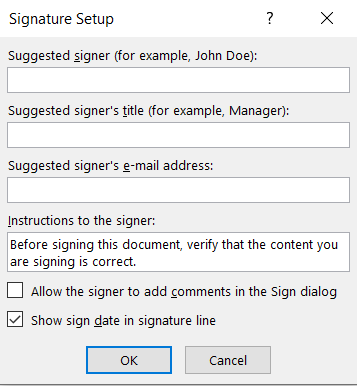
- From the Insert drop-down option, tap on the signature line. There should be a pop-up dialogue box.

- After making the necessary selections, click OK.

- The results will be as follows.


How to Add Signature in Word on Mac?
Now that we have discussed the procedure to add signs on windows, let’s move on to adding signatures in Mac Computers. There’s a slight difference in the procure. Here’s how you can add a handwritten sign on Mac.
How to Add Handwritten signature on Mac?
If you are using Mac Computer instead of windows, the steps are a little bit different. But the core is the same so you’ll not face any problems. Just follow the below steps to add sign into your word file on Mac.
- Again, start with signing on a blank white paper that you want to add to your word file.
- Make a JPG or PNG image by scanning the page and saving it as an image.
- In the absence of a scanner, you may just snap a picture with your phone and upload it to your computer or email it to yourself.
- Open the word document on which you want to add your signatures.
- Click “Pictures” on the “Insert tab” at the top of the screen’s ribbon.

- Using the drop-down option that displays, choose a picture from a file from the folder that you saved.
- Click Insert after selecting the image you just uploaded.
- You may access the “Photo Format tab” in the ribbon by clicking on the picture after it has appeared in the document.
- That tab has a button called Crop, which you may use to crop the picture to your preference.
- In Word, right-click the picture and choose “Save as Picture” to save it as a file that may be used in other documents.

How to Add Signature on Word Using 3rd Party Apps?
Even if Word’s functionality is good, it doesn’t have as many possibilities as some of the other tools. When it comes to transmitting and receiving documents, third-party tools like PandaDoc provide a slew of capabilities that may make your life simpler.
- Here’s how to use PandaDoc’s electronic signature software to add sign a Microsoft Word document.
- Select the “New Document” option in PandaDoc after logging in.
- In the Upload tab, either drag-and-drop the Word document or click Choose A Local File to upload.
- Tap on the “Display As” button. Now, you’ll see the document in the PandaDoc editor.
- Drag and drop a signature field into the document by clicking the “Signature tab” in the right-hand menu.
- Sign your name in the signature box and choose yourself as a recipient, or add an additional person to the list.
- Double-click the signature box to complete the process. If you want, you may upload a picture of the signature or draw it yourself, or you can type it in manually.
- Once you’ve clicked the Complete button, you may save the file in the format of your choice.
That’s how you can add your signatures to Microsoft word without any hassle. The process is pretty much simple and doesn’t require any technical expertise. In case you have any doubt, do let us know in the comment section below.